Monday, September 17, 2007

Index

1. Getting Started
1.1 Importing clips from a camera
1.2 Importing clips from files

2. Basic Editing
2.1 Cutting clips
2.2 Adding effects and transitions and titles
2.3 Adding themes
2.4 Editing tips

3. Intermediate/advanced video editing
3.1 Adding chapter markers
3.2 Dubbing over a clip

4. Sharing clips
4.1 Different file types explained
4.2 Putting videos on Youtube

5. Effects
5.1 All Imovie effects in one video
5.2 The photograph effect

6. Other
6.1 Free and paying plugins
6.2 Article request and questions

Different file types explained

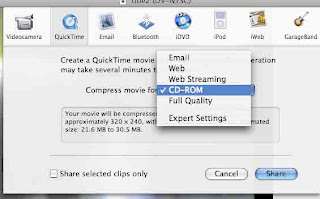
Once you want to share a video you have to chose a video type, here is a list of the available ones and their pros and cons:

3g: 3g is a phone technology, it is offered by carriers such as At&t, it will be a pretty small file but only recommended for 3g phone users.

Apple TV: Self explanatory, only use this if you have an Apple TV

AVI : This is a Divx file type, it is great because it keeps nice quality while reducing size, to play this with quicktime you need an additional plugin.

BMP: Originally an image type, this option is not recommended for basic users

DV stream: Digital camera's record into DV nowadays, this option will give a big file size for a nice quality

Flash video (FLV): This format is great if you plan to upload to youtube, it does, however, take very long to make the file.

Hinted Movie file: a file ment for quicktime streaming.

Image sequence: As the name states, images one after the other. great for making gifs

Movie to iphone and to ipod are self explanatory.

Mpeg-4: Streaming for quicktime, like a hinted movie file.

Movie to picture is self explanatory

Movie to quicktime movie: Recommended for most users, this makes a .mov file.

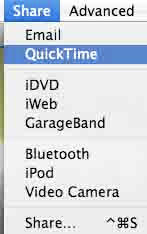
To get to the menu, click on share then share again, then click on advanced

Saturday, September 15, 2007

Importing clips from files

Importing clips from files is quite simple.
It just requires dragging, and mostly, patience.

To do this just drag and drop the clips into the canvas (where your other clips are).
Normally you should see a progress bar, importing a clip takes a while.

Dubbing over a clip


this is not my work but an excellent tutorial

All or most of the Imovie effects

see a little preview of every effect, this will help you get inspired!!


The "photograph" effect

here you are 
ps: i have not created this video

Monday, September 10, 2007

Adding themes

Themes is a great new feature in Imovie, it lets you give your movie a beautiful and professional style.
1. Go to the themes tab
2. Chose a theme
3. Drag the clips into the drop zone and write the titles
4. Once done, hit apply, be patient, rendering (red progress bar) takes a while to complete
here is a little video to show you what you can do with themes


Adding chapter markers


You are probably wondering why you would want to add chapter markers, chapters allows users to quickly jump to what part, once you import the movie into Idvd you will have a scene selection!
1. Put the playhead at the desired position for your marker
2. Add the chapter Marker


To see your current chapter markers, click on the Chapters Tab, here you can name your chapters and reorder them:

Sunday, September 9, 2007

adding effects and transitions and titles


this article covers adding transitions and titles.
Adding titles. 
1. First of all, you must be in the editing menu (bottom right) and in titles (top right), see picture.
2. The menu is quite self explanatory, but there is one thing i want to point out, the circle with the arrows indicates which way the text is
 going/which way the text is coming from. Yo
u can change it for different effects. 
3. If you get an error message saying your clip is not long enough you have to bring the speed down.
4. Drag and drop the style of text (in this case, rolling centered credits) on the clip you want it to be applied to, or just click apply.
5. If you have successfully done this a progress bar will appear as shown here:


Effects:
Repeat every step except number 4 which changes a bit.
You have to drag the effect in between two clips, the clips will separate and a green + will appear as shown below (the green + isn't there because it disappears when i press the shortcut to take a screenshot)

Wooot! Google! I am in on page one (with a typo)

i tried searching with a space, but  after page 10 I still haven't found my blog (not a surprise)
well i am proud :)


Cutting a clip


Cutting is essential to making a movie. There are two ways to cut, i will first show you the one i deem faster:
1. first put your playhead to where you want to cut.
2. Click on apple + T or go to edit/split video clip at playhead.
This will split the clip where you specified, all you have to do now is delete the clip you do not want.
This will indicate the clip being deleted:


And you are done!

Saturday, September 8, 2007

Imovie plugins (free and paying)

Free

BKMS Plugins  
A nice plugin site, many transitions
Xe847: a free plugin that makes videos as seen through the human eye (demo)
image stabilizer: great if you have many shaky shots! (demo)
imageIP works with a watermark, you have to pay to remove it.
jerry's plugins: (direct link) 100% free, good addition
join clips: free demo with limited ability
stupendous software: some free effects with every pack
Virtix: free demo's.

Paying:
Imovie Plugins: hundreds of plugins, great site
ezedia: many interesting plugins
GeeThree: literally 100's if not thousands of plugins
trix software: make 3d clips and more

a nice utility i found (not Imovie related)


this site lets you advertise your blog while browsing others. Its really simple to use and useful.
Join up and start surfing!!!

Questions/ article request

I will gladly type up an article on the subject you specify. If you leave your email i will mail you when its done with a link.


how to put videos on youtube


so to put videos on youtube, you simply need to convert the video and then upload it.
to convert the video:

1.click on share and chose quicktime:

Then this window should pop up. For shorter movies i recommend CD quality. Remember, Youtube videos can only be 100 megabytes maximum, so adjust accordingly:


This will take a while, so you must be patient, then you can upload that file to youtube!

my most recent video

its juggling:


Display Pagerank

Editing tips


1. Before cutting clips when making a movie with a musical background, put the music in first. To cut with the music. There are 3 things to verify: all three of them are circled:

2. Arrange all your clips in the order you wanted them before cutting them. This allows you to check the development of the story and to see where clips are missing.

3. Save regularly! The shortcut is apple-S.

4. Use shortcuts to speed up your work, here are some of the most useful ones.
space : play/pause
side arrow : move back or forward one frame
shift-side arrow: move back or forward  5 frames
apple-T: cut video clip at playhead
apple-Z: undo

5. Do not overdo it with the effects. Effects are fun in small quantities, if your whole video is composed of flashy effects then it is overwhelming.

6. While cutting clips, start from the beginning of your movie and go towards the end, try to not re-cut the clips, it will un-sync the clips with the music.

7. Make a storyboard before filming a music video, if you do not you will probably forget to film some clips.

8. Imovie help (and this site) are your friends.

Importing clips from a camera


first things first, after having finished filming that home video you need to import the video.
1. rewind the camera to the first clip you want to capture
 
2. Normally, the button should switch from the 
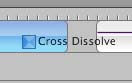
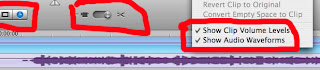
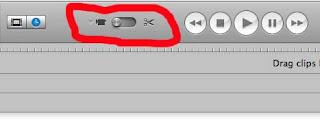
right to the left (see image). If not, move it manually.

3. An import clips button should be there, click on it and just sit back, relax and watch your clips. When you have reached the end of what you wanted to import, hit the "stop" button (in between the play and previous button on the picture)

4. You may now disconnect your camera, your clips are now imported!
congratulations!